Azure Deployment
Deployment Overview
Account Folders and Permissions
The Qarbine web content is within /var/www/qarbine and its owner and group are qarbine:qarbine. The Qarbine services code is under /home/qarbine/qarbine.service. The web application content is contained within /var/www/qarbine.
The steps to set up SSH access are described in detail below in the “Setting Up SSH Access” section.
Determine SSH Access
SSH is used to configure and manage some Qarbine operations. A public and private SSH key-pair is required. To create a Linux VM that uses SSH keys for authentication, specify your SSH public key when creating the VM.
If you do not have a key-pair identified, then one can be easily defined. The steps below locally generate key-pair files. Azure has many options for defining and managing public keys. Refer to your company policies for specific guidance.
When launching the VM also use “qarbine” as the username . This is noted in the steps below.

Creating a Key-Pair (if necessary)
This key-pair is for accessing your deployed Qarbine VM. The general command line format is
ssh-keygen -m PEM -t rsa -b 2048
For Mac and Linux details see
https://learn.microsoft.com/en-us/azure/virtual-machines/linux/mac-create-ssh-keys#create-an-ssh-key-pair
On Windows you can create an SSH key-pair by following the steps at
https://learn.microsoft.com/en-us/azure/virtual-machines/linux/ssh-from-windows#create-an-ssh-key-pair
Enter a file name and no passphrase.

This creates the following files

The first file is the private key file and the second the public key file. The private key file is sometimes referred to as a Privacy Enhanced Email (PEM) file.
Basic Topology Example
An initial Qarbine deployment has a primary Qarbine node which provides the web application support and core service interactions. This node has an internal database containing your Qarbine configuration information and the catalog components used to retrieve data, analyze it, and present it. You can configure Qarbine to access multiple data endpoints which can span technologies, cloud providers, and geo-locations. The basic deployment is depicted below.
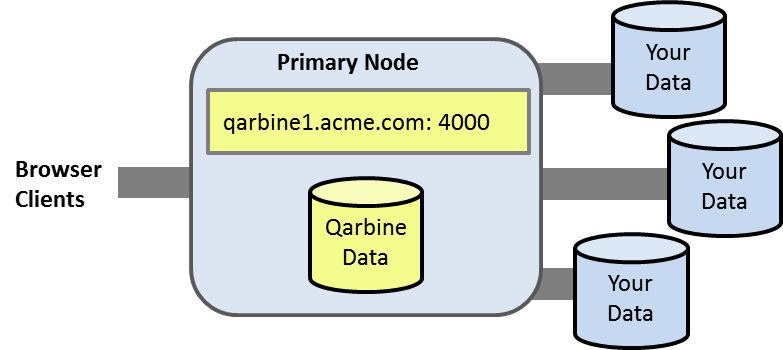
Multi-node and multi-endpoint hosts can be deployed based on Qarbine feature level. Please see the “Deployment Considerations” document within the Getting Started area.
DNS and IP Association
SSL is used for browser and endpoint interactions. The host name must resolve to the desired public IP address. To avoid having your instance’s public IP address change after a reboot and break the DNS resolution, use a static IP address. During VM creation you can choose
- an existing Azure Static Public IP,
- to create a new Static Public IP, or
- wait until after creation to obtain the assigned public IP address.
Azure Portal details can be found at
https://learn.microsoft.com/en-us/azure/virtual-network/ip-services/virtual-network-deploy-static-pip-arm-portal?toc=%2Fazure%2Fvirtual-machines%2Ftoc.json
Azure Powershell details can be found at https://learn.microsoft.com/en-us/azure/virtual-network/ip-services/virtual-network-deploy-static-pip-arm-cli?context=%2Fazure%2Fvirtual-machines%2Fcontext%2Fcontext
Memory Considerations
If the Qarbine internal vector embedding service is going to be used then at least 2 GB of memory is required.
Creating the Qarbine VM
In a browser, navigate to the Azure Marketplace at
Search for Qarbine.
Select the desired Qarbine version and review the offer information.
Once satisfied, click
 .
.
The Azure “Create a Virtual Machine” wizard page is opened.
In “Project details” adjust these values for your environment.

Provide a meaningful VM name such as shown below. Note that an Azure VM’s name may not be changed later.

Verify the image value.

If desired, increase the size of the VM for one with more resources.

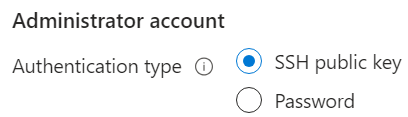
SSH Public Key Access
For access choose
Set the user name as shown below so that /home/qarbine is easily accessible.

Choose your SSH access options.
If you already have a key-pair stored in Azure then your options look similar to

Or, if you just created or have access to key-pair files then your options look similar to

The “SSH public key” value is the content of your public key file.
Adjust any other values on the page per your policies.
Click

One setting to consider adjusting is.

Adjust any other values on the page per your policies.
Click

The initial port settings MUST have ports 22 SSH, 80 HTTP, 443 HTTPS, and 4000 Qarbine endpoints open.

You may want to consider checking this option

Adjust any other values on the page per your policies.
Click

Adjust any other values on the page per your policies.
Click

Adjust any other values on the page per your policies.
Click

Adjust any other values on the page per your policies.
Click

Adjust any other values on the page per your policies.
Click

The top of the next page should show

Review the settings. Once satisfied, click

Wait to soon see

Wait a bit to then see

Navigate to the VM by clicking

To access your VM, copy the public IP address for SSH console use.

Deployment Wizard Preparation
DNS Checkpoint
Qarbine operation requires a consistent public IP address and DNS resolution. Some certificate services like Let’s Encrypt do not accept AWS host names for example. You can use your own certificates or have the Qarbine Deployment Wizard create Let’s Encrypt ones with a non-Azure DNS host name. Services like no-ip.com let you create DNS names associated with your Azure static IP.
- Decide on a new host name for which you can set a public DNS entry for.
- If the IP address is known at this time, then adjust your DNS records to map to the public IP address.
At this point you have a consistent public IP address and associated DNS name resolution.
Validate SSH Access
The ssh executable tool is common on Linux and Windows. Below is the structure of the command line to access the Qarbine VM.
ssh -i PEM_FILE qarbine@VM_IP_OR_NAME
For example,
ssh -i myqarbine-1.3.pem qarbine@172.191.163.3
If you've never connected to this VM before you'll be asked to verify the hosts fingerprint.

Once validated the SSH console is shown.
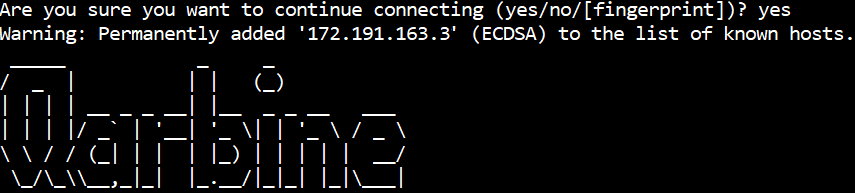
You should now have an SSH prompt.
If you see

then update the VM’s SSH access using the instructions in the section below and try again.
Optional- Using putty SSH Access
If you are using putty for SSH access, the private key file (sometimes a file named with the PEM extension) has to be converted into a PPK formatted file compatible with putty. To perform the conversion open puttygen.
Load the PEM file by clicking

Navigate to the file and select it.
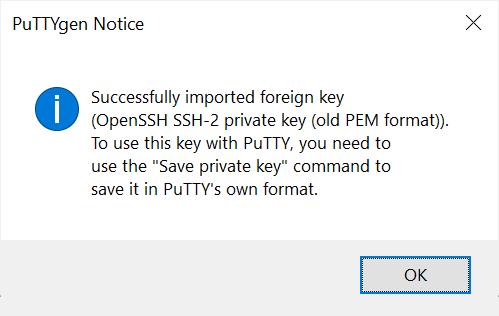
Click

Click

To the dialog

Click

Enter a filename

Click

Close puttygen.
To confirm SSH access, run putty.
Set the hostname to your DNS value.
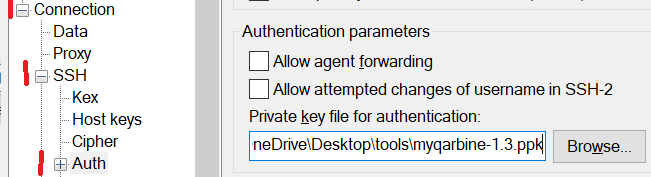
Reference the PPK in the section noted below.
Click

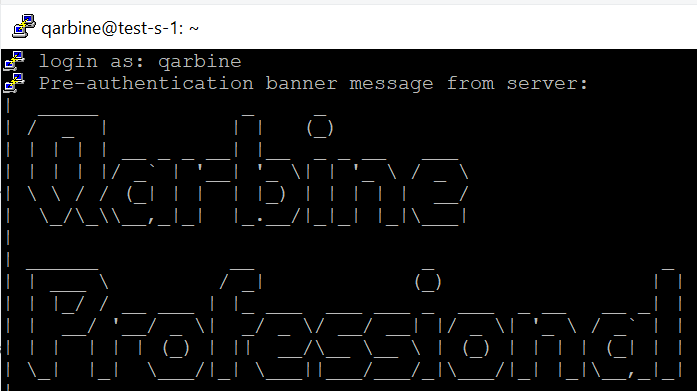
A login prompt is shown. Enter the ‘qarbine’ username.

Press the Enter key. The result is shown below.
If putty fails to connect with a permission error then update the VM’s SSH access using the instructions in the section below and try again.
If you see this dialog

then follow the steps below to provide an explicit SSH configuration.
Updating the VM’s SSH Access
As noted at the beginning, the SSH username must be ‘qarbine’ for the desired VM interaction and operation. Detailed instructions for the following steps are located at
https://learn.microsoft.com/en-us/troubleshoot/azure/virtual-machines/troubleshoot-ssh-connection#use-the-azure-portal
Navigate to the running VM’s properties page.

Scroll down to the Help section and expand it.

Click

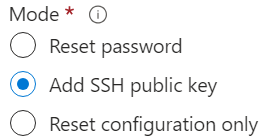
Option 1 Public Key Information
This is the recommended approach vs. the user and password one below.
Choose the option shown below.
Enter the name. It must be ‘qarbine’.

Next you can either set the text of the public key by choosing the option shown below

and enter the content of your public key file for the “SSH public key” value.

Or, use an existing Azure managed key-pair

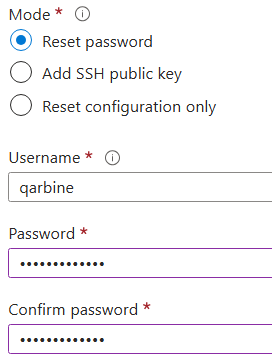
Option 2 User and Password
Specify a user and password combination as shown below.
In All Cases
Click

The VM will be updated and include an entry in /home/qarbine/.ssh/authorized_keys. You can now use your preferred SSH tool to access the VM with the credentials provided.
Next Steps
You are ready to run the Deployment Wizard. Instructions for that are available at http://doc.qarbine.com/docs/Getting%20Started/Deployment/deploymentWizard
Appendix
Creating New SSH Key-Pair
Below are the steps to create a completely new SSH key-pair from the “Reset password” page.
Enter the name. It must be ‘qarbine’.
Choose

Choose

Specify a key name such as the name of the VM for easy cross referencing.

Click
At the prompt
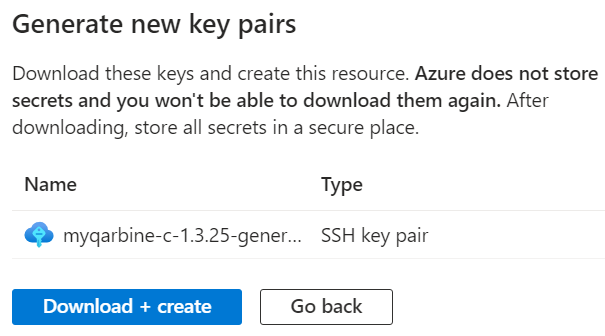
click

The private key (Privacy Enhanced Email/PEM) file will be stored into your browser’s download folder. Save it off because it will be required to access the VM. The VM will be updated and include an entry in /home/qarbine/.ssh/authorized_keys with the public key of the “qarbine” user.
A sample command line to use this new file is
ssh -i myqarbine-c-1.3.25-generated.pem qarbine@20.42.96.123